Friday, November 16, 2018

Sitecore 9 High CPU Usage Issue


Recently I came across a strange issue where 100% of the CPU was consumed as soon as I started running Sitecore 9 instance and Sitecore website in my local environment.

Per Sitecore's suggestion we had a laptop with decent configuration (Windows 10 64 Bit, 16GB RAM with SSD an so on). As I debugged into log files I couldn't notice any obvious reasons. However when I looked into task manager I found out that the JAVA Binary was consuming 95% of the CPU. Once I stopped SOLR, CPU usage was back to normal. This may all sound rather obvious but I was banging my head against the desk for about an hour before I tracked it down.:( 

I found out that the path that we had in the Environment variables wasn't valid anymore and was the culprit for the RAM and MEMORY consumption!!!  Not sure if the java automatically updated to newer version which caused the changes or something else.. Either way once I changed the path everything was back up to normal. 

Also one another step was to restart the Sitecore XConnect services. 

Hope this helps someone!

Tuesday, September 25, 2018

How to fix Sitecore View Rendering Visual Studio Intellisense issues


While working on a Helix implementation or even regular Sitecore implementation I came across various intellisense issues in Visual Studio. Some of them are descriptive and some of them aren't. Here are few sample errors that you might come across:


  • The type or namespace name 'Helpers' does not exist in the namespace 'System.Web' .
  • The type or namespace name 'xyz' does not exist in the namespace 'System.Web.Mvc'.
  • 'System.Web.Mvc' doesn't contain a definition for Sitecore and no extension method Sitecore accepting first argument of type.....
You should be able to resolve this issue by following one or more of these steps: 


  1. Update your view's Web.config file with Sitecore's Web.config file as below. Make sure to clean and rebuild the solution once done. 
  2. Once you add the config file and if you are still experiencing issues make sure that the referenced dll is added to the solution. For ex: As above error if it complain about System.Web.dll make sure that it's referenced properly by Nuget. 
  3. Make sure that the dll exists in the bin directory. If not set the Copy Local property in Visual Studio for the dll. Specially for Sitecore make sure that Sitecore.Kernel, Sitecore.Mvc, System.Web, System.Web.Mvc, Glass Mapper dlls(if you are using glass) are referred in the solution. 
  4. In VS 2017 when I experienced this issue I resolved it by updating the DotNetCompilerPlatform by adding one more compiler option in the web.config. The default is 1659;1699;1701; I added 1702 as below:
These are few of the common scenarios and solutions which fixed my issues. If you came across a different solution please feel free to share.


Friday, August 24, 2018

Sitecore 9 Experience Platform Installation Steps using SIFLESS - A Step by Step Guide

Loooong List of Prerequisites:

  1.  Visual Studio 2017
  2.  Sql Server 2016 SP1
  3.  Sql Server Management Studio - – (** Make sure to set up above sql server user ( You can create any username. For local work stations I use sa account. ) with SQL   Server Authentication. Make sure to uncheck enforce password policy and select sysadmin   role)
  4. Run below script in SQL Server ( This came straight from Sitecore ) : 
  5. sp_configure ‘contained database authentication’, 1;
    GO
    RECONFIGURE;
    GO
  6. .Net Framework 4.6.2 or later
  7.  IIS(v10)
  8.  Microsoft Web Platform Installer - Once you download this you should be able to download below by searching and installing it directly from Web Installer.
    1. Web Deploy 3.6
    2.  URL Rewrite 2+
    3.  Microsoft SQL Server Data-Tier Application Framework(17.1)
    4.  Microsoft SQL Server Transact-SQL ScriptDom 
  9.     JDK and Java Runtime Environment
  10.   Windows Powershell 5.1+
  11.   Microsoft® SQL Server® Data-Tier ApplicationFramework
  12.   Sitecore Installation Framework - Refer to Download options for On Premises deployment.
  13.   Sitecore XP Package for XP Single 
  14.   Microsoft Visual C++ 2015 Redistributable Update3
  15.   SOLR 6.6.2
  16.   SIFLESS Package
  17.   Download Non-sucking service manager (NSSM) tool
  18.   Once you have IIS enabled make sure to enable below below settings (screenshot below) :
a.       HTTP Redirection
b.      Web DAV Publishing
c.       .NET Extensibility
d.      ASP.NET 4.6
e.       IIS Hostable Web Core
f.        SMB 1.0/CIFS File Sharing Support

Step 1 - Set up Installation Directories:

  • Create a folder by name “Sitecore” and another folder by name “install ( inside Sitecore ) ” in your C: Drive. ( C:\Sitecore\install ). This could be any available drive. 
  • Copy license file inside install folder.
  • From step 11 above you should have downloaded the Sitecore packages. Open Sitecore 9.0.2 rev. 180604 (WDP XP0 packages).zip and copy Sitecore 9.0.2 rev. 180604 (OnPrem)_xp0xconnect.scwdp.zip and Sitecore 9.0.2 rev. 180604 (OnPrem)_single.scwdp.zip into C:\Sitecore\install.
  • Copy only files of XP0 Configuration files 9.0.2 rev. 180604.zip into C:\Sitecore\install.
  • Your folder should now look like:


Step 2 - Configure SOLR:

  • Make sure to install java libraries before proceeding.   
  • Next Step is to set up Java Environment Variables. Go to View Advanced Settings in Windows 10 and click on Environment Variables. Add new one as "JAVE_HOME" as below: 
Edit the Path variable and add a new one as below:

  • Extract the contents of SOLR 6.6.2 into C:\Sitecore\folder. 
  • Quick Check - Navigate to bin folder and start solr to see if it's working.


If you see any issues while running the above step it is due to a bug in solr cmd. Make changes in cmd as described here - https://trayek.wordpress.com/2018/06/06/installing-solr/

Step 3 - Configure SOLR as Service using NSSM:

  • Download Non-sucking service manager (NSSM) tool and extract contents under C:\Sitecore folder. Rename the folder as nssm. 
  •  Open CMD prompt as admin and navigate to nssm bin folder and run nssm install command as below.
  • Once you enter all info click Install Service which should install it as a service and you should now be able to start it as a windows service from services.msc. 
  •  Verify if you can browse solr at http://localhost:8983/solr

Step 4 - Sitecore 9 is all about Security.... Time to add SSL to SOLR and make it Secure

  •  Instead of creating this manually sitecore community has some very good powershell scripts to do the same. You can download the script from here and drop it into Sitecore installation folder.
  •  Script uses Java KeyTool and we need to update the script with local paths. Open the script and replace keyTool ( found in line 34 or so ) Path as below:
    • try { $keytool = (Get-Command 'C:\Program Files\Java\jre-10.0.2\bin\keytool.exe').Source }
** Make sure to verify your path.


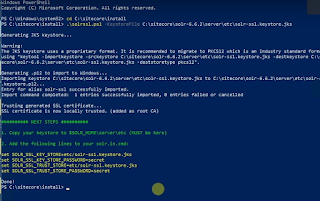
  • Run the powershell window as admin and navigate to installation directory. As an argument you have to pass in the solr directory ( server \ etc folder ) while running the command. See below:
  • You can confirm above step by navigating to the folder and verify if the keys are created.
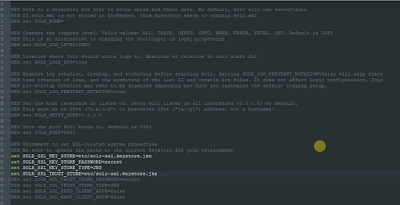
  • Few more things before we wrap this up - Open solr.in.cmd from bin folder and remove the comments in SSL Section as below:
  • Save the above file and restart the service. You should now be able to navigate via https as this - https://localhost:8983/solr/#/

    Step 5 - Configure SIF

  • In Windows, launch PowerShell as an administrator. 
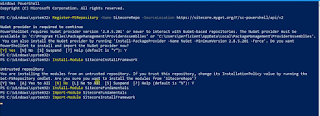
  • To register the repository, in a PowerShell command line, run the following cmdlet: 
Register-PSRepository -Name SitecoreGallery -SourceLocation https://sitecore.myget.org/F/sc-powershell/api/v2
  • Install the PowerShell module by running the following cmdlet: Install-Module SitecoreInstallFramework 
  • When prompted to install, press Y, and then press ENTER. 
  • Install Sitecore Framework using Install-Module SitecoreInstallFramework 
  • Install Sitecore Fundamentals Module using Install-Module SitecoreFundamentals. 
  • Import both modules – Import-Module SitecoreInstallFramework, Import-Module SitecoreFundamentals. 
  • See below if needed.

Last Step – Install Sitecore using SIFLESS

  • Extract SIFLESS zip into your C: Drive and run SIFLESS.exe as an Admin from extracted folder and then fill in all the details as below.
  • Click Test and you shouldn’t see any issues. If you have any fix them before proceeding. Run Generate Files and Install. That’s it!!!